
For years, KDSI warned against the use of IMAP on your mail client-at least as an exclusive means-because the size of the mailbox quotas was so low that inevitably someone would run over quota. The suggestion was to always use POP for at least one primary device when checking email. In today’s world, people want to be able to look at their email from wherever they are on whatever device they are on and IMAP really is the only choice if you require access on a work machine, home machine, mobile phone or tablet and want to see the same content across all of those devices.
IMAP still creates a problem, however, if no maintenance is done. The new quota sizes of 500 MB will still run out fairly quickly without some sort of management. That is why we are suggesting that if you want to use IMAP, that you enable your primary machine (work or home PC or laptop) with archiving.
To help you with this, we will provide here the steps for creating an archive on your local machine for some of the primary mail clients and using archiving to manage your IMAP mailboxes.
Outlook
While we can’t tell you the specific key strokes on every version of Microsoft Outlook, we will provide here the steps for setting up Outlook 2010 or 2013. Other versions of outlook will have similar setting under similar menu headings. We assume that if you need IMAP archiving, you are pretty well versed in the features of your email client and know your way around. If other version steps are required, we will include them here at a later date.
Setting Up Archiving
- Click File and Options
- Click Advanced in the navigation pane on the left
- In the AutoArchive section click on AutoArchive Settings and the dialog below will appear

The default settings in the dialog will have AutoArchive run every 14 days and will move (not delete) messages older than 6 months old to the archive folder. Depending on the volume of email you receive and the number of attachments, you may want to change the value of the number of months in this dialog down to compensate for your quota limitations. Also, note in the dialog where the archived messages are going to be stored, as you will want this for accessing your archived email later.
Accessing Mail in the Archive
As stated above, the archiving process does not delete email, it simply moves it into the archive. Note, too, that the archived folders will not show up until the AutoArchive process has run once. Here are the steps to access your archived email.
- Click File then Open & Export
- Click on the Open Outlook Data File button. The Open Outlook Data File dialog will appear
- Select the file you want to open (see the note above) and open it.
Windows Live
With Windows Live Mail, there is no AutoArchiving feature. However, you can do archiving manually to keep your IMAP mailbox clean and your quota in tact.
Creating the Archive Folder
- Click the “View” tab and ensure the “Storage Folders” button is pressed
- Right-click the “Storage Folders” heading in the left-hand pane and select the “New Folder” option
- Give the folder a name (perhaps the year and archive, example 2015_Archive)
- Click the “Storage folders” heading in the “Select the folder in which to create the new folder” dialog and then click “Ok”
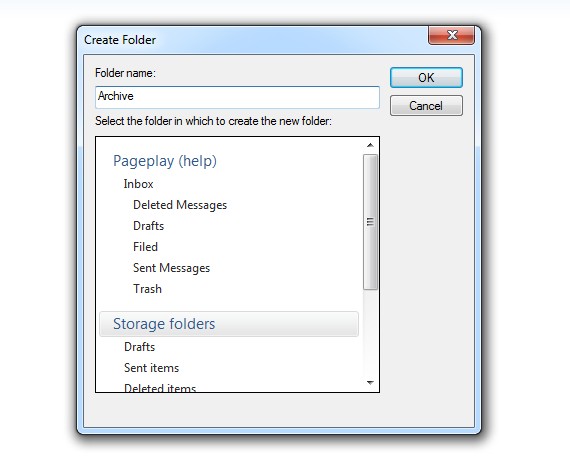
You will then see your newly created folder under the “Storage Folders” heading.
Archiving
It is suggested that you use regular intervals for archiving your email. Archiving can be done in the following manner.
Select the emails in your folder that you want to archive by right clicking on them and using the “Move to folder…” option and then selecting the folder you created above and clicking “OK.” You can do this in groups of emails, sorted by date, using a 4 or 6 months old criteria, depending on the volume of email you receive.
Accessing Mail in the Archive
Windows Live treats your archive folder just like any other folder in your email system. The difference is that these messages are now stored locally on your PC instead of on the server. To access our example folder, we would find it under the “Storage Folders” heading and just click on it to open it.
Thunderbird
The process for archiving in Thunderbird is very similar in nature to Windows Live Mail. There is no AutoArchiving feature, but the process for setting up an archive folder is simple as is the process for moving messages to the archive.
Creating The Archive Folder
- Right-click on the “Local Folders” in the left-hand pane and select new folder.
- Name your folder something that makes sense, example 2015_Archive
- Your folder will appear under the Local Folders
Archiving
- Select the messages that you want to archive. It is recommended that you use a standard, say anything older than 4 or 6 months.
- Right-click on your newly selected messages and select the “Move to…” then highlight “Local Folders” and finally choose the archive folder you created above.
Accessing Mail in the Archive
Again, you can access this email by simply selecting it with your mouse. All folder options (search, etc.) are available just like any other folder.
Mail for Mac
Creating the Archive mailbox
- Open Mail and then click on “Mailbox” and then “New Mailbox”
- In the box that appears, choose “On My Mac” as the location and name the folder
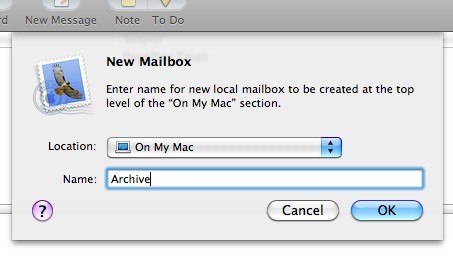
The new mailbox that you created above, will now appear in the “Mailboxes” section on the left-hand pane.
Archiving
Either drag and drop email that you want to archive to this folder, or select multiple emails and right-click (Cntrl + Click) a selected email or emails and use the “Move To” to move the message(s) to your archive folder. It is recommended that you use a 4 or 6 month old criteria to move email, depending on the volume and size of the emails you receive.
Accessing Mail in the Archive
Just like Windows Live Mail and Thunderbird, you can access this email just like any other email folder that you have. The difference is that these messages will be stored locally and not on the server, and thus will not take up your quota.